
Image optimization isn't just a technical task for your developer; it's a core business activity. Get it right, and your website loads faster, keeps visitors engaged, and converts more leads. Get it wrong, and you're actively losing money.
It comes down to three things: resizing your images, compressing them to shrink their file size, and choosing the right format (like WebP). Let's break down why this is one of the highest-impact improvements you can make to your website.
Why Slow Images Are Silently Killing Your Business

If your website takes more than a few seconds to load, you are losing customers. The single biggest culprit we see slowing down business websites is unoptimized images, which often make up more than half a page's total weight.
This isn't an abstract tech problem. It's a direct hit to your bottom line. We've seen it countless times: a business invests in a beautiful website, but it’s so sluggish it drives away the very customers it was designed to attract.
The Real-World Cost of a Slow Website
Every extra second of load time erodes your credibility and your revenue. Think about your own habits—how long do you wait for a slow page before you give up and go elsewhere? Your customers are even less patient.
That delay has tangible consequences for businesses like yours:
- Lost Leads: A home builder's gorgeous portfolio, filled with massive photo files, loads so slowly that a potential client gets frustrated and moves on to a competitor's site.
- Abandoned Carts: An e-commerce site's product images are so heavy that shoppers bounce before they even have a chance to add an item to their cart.
- Wasted Ad Spend: You're paying good money for clicks on Google Ads, but visitors leave before your landing page ever finishes loading. That's just throwing cash away.
Every unoptimized image on your website is a speed bump for your customers. A few are an annoyance. Too many, and they'll abandon the road entirely.
The Undeniable Link Between Speed and Revenue
The connection between site performance and business success is clear. Properly optimized images can dramatically cut page load times, fixing one of the biggest frustrations for visitors. It's not uncommon for images to make up 50-90% of a page's total weight. When you consider that Google's data shows 53% of users bounce if a site takes more than 3 seconds to load, the urgency becomes obvious.
A fast website signals professionalism and respect for your visitor's time. It builds trust before you’ve even had a conversation.
Fixing your images is one of the highest-impact changes you can make. It’s a foundational win that makes all your other marketing efforts—from SEO to paid ads—work that much harder for you. To get the full picture, you can learn more about how to improve page load speed across your entire site in our comprehensive guide.
1. Pick the Right Image Format for the Job
Choosing an image format might sound like a minor technical detail, but it’s a critical first step. Getting this right means your site looks professional and loads quickly. Getting it wrong leads to blurry logos or massive, slow-loading photos that make visitors click away.
Think of it like this: you wouldn't use a paintbrush to hammer a nail. Each format—JPEG, PNG, and WebP—has a specific job. Matching the format to the image type is the groundwork for a fast, sharp-looking website.
JPEGs for Photos and Complex Images
For any kind of photograph, JPEG (or .jpg) is your workhorse. It’s built to handle the millions of colors and subtle gradients found in real-world images, making it perfect for everything from product shots to team headshots.
- Real-World Example: A custom home builder showcasing a gallery of a kitchen remodel. JPEGs will capture the detailed wood grain and countertop textures beautifully without creating a massive file.
- Key Benefit: The magic of JPEG is its compression. You can drastically shrink the file size without a noticeable drop in quality—exactly what you need for fast pages.
The main limitation? JPEGs don't support transparent backgrounds. If you save a logo with a transparent background as a JPEG, you'll get an ugly white box around it.
PNGs for Logos and Graphics with Transparency
When you need a transparent background, PNG (.png) is the hero. It's designed to keep sharp lines, text, and solid colors perfectly crisp, making it the standard for logos, icons, and illustrations.
- Real-World Example: A law firm needs to place its logo over a dark-colored header on its website. A PNG file ensures the logo looks clean and integrated, with no boxy background.
- Key Benefit: It offers "lossless" compression for simple graphics and is the only reliable choice for transparency. The downside is that PNG files for photos are huge compared to JPEGs, so use them only where they make sense.
WebP: The Modern Standard for Performance
What if you could get the quality of a PNG with the small file size of a JPEG? That’s where WebP comes in. Developed by Google, this next-gen format offers the best of both worlds.
We consistently see WebP images that are 25-35% smaller than their JPEG counterparts with no visible difference in quality.
Because smaller files mean faster load times, Google gives a nod to sites using WebP. It's a simple switch that benefits both your user experience and your technical SEO, helping you stand out from competitors still using old formats.
WebP handles both transparency and photographic detail, making it a versatile format for almost any image. It's what we use for our clients to give them that extra performance edge.
Image Format Comparison: When to Use Each
Here's a quick cheat sheet for choosing the right format. It’s all about balancing quality with performance.
| Format | Best For | Key Benefit | Watch Out For |
|---|---|---|---|
| JPEG | Photographs, complex images with many colors, gradients. | Excellent compression for small file sizes with good quality. | No transparency support; can look blurry if over-compressed. |
| PNG | Logos, icons, graphics with sharp lines, and any image needing a transparent background. | Flawless transparency and crisp quality for simple graphics. | Very large file sizes for photographs, which will slow your site. |
| WebP | Everything—photos, logos, graphics. It’s the all-in-one modern choice. | Superior compression (25-35% smaller files) and supports transparency. | Not yet supported by very old browsers (though this is rarely an issue now). |
Starting with the right format sets the stage for everything that follows. Choosing WebP whenever possible is the smartest move for performance, but knowing when to fall back on JPEG or PNG is key to a well-built site.
2. The Art of Image Compression and Resizing
After you've picked the right image format, this is where you make the biggest gains in site speed. Image compression is the process of shrinking file sizes, ideally without anyone noticing a drop in visual quality. For a fast website, this isn't optional.
Think of it like packing for a trip. You can just cram everything into a suitcase, but it’ll be a heavy, bulky mess. Or, you can fold and roll your clothes to fit more into a smaller, lighter bag. Image compression is the digital version of that.
Lossy vs. Lossless Compression Explained
You'll run into two key terms: lossy and lossless. The difference is straightforward.
-
Lossless compression removes redundant data without discarding any information. When the file is opened, it’s a perfect pixel-for-pixel replica of the original. The file size reduction is usually minimal.
-
Lossy compression is the smarter approach for the web. It cleverly throws out data that the human eye is unlikely to notice. This results in a slight, calculated drop in quality but a dramatically smaller file size.
For 99% of websites—whether you’re a contractor showing off a project gallery or a restaurant with photos of your menu—lossy compression is the hands-down winner. The tiny, often invisible, reduction in quality is a small price to pay for a file that's 50-70% smaller and loads in a snap.
Your customers will never spot the subtle data that lossy compression removes. What they will notice is a website that takes five seconds to load a "perfect" lossless image. They won't stick around.
Resize Images Before You Do Anything Else
Here’s a classic mistake: a business owner uploads a massive 4000-pixel photo straight from their camera. But on the webpage, that image is only ever shown in a space that’s 800 pixels wide. This forces the visitor's browser to download the entire enormous file first and then shrink it down—a huge waste of bandwidth and time.
Always resize your images to the exact dimensions they’ll be displayed at on your site before you upload them. If your blog's main content area is 750 pixels wide, resize your blog images to match. Don't make your visitors' browsers do unnecessary work.
This simple workflow—choosing the right format, resizing to the correct dimensions, and then compressing—is the bedrock of image optimization. This flowchart gives you a quick visual guide for the format selection part of the process.
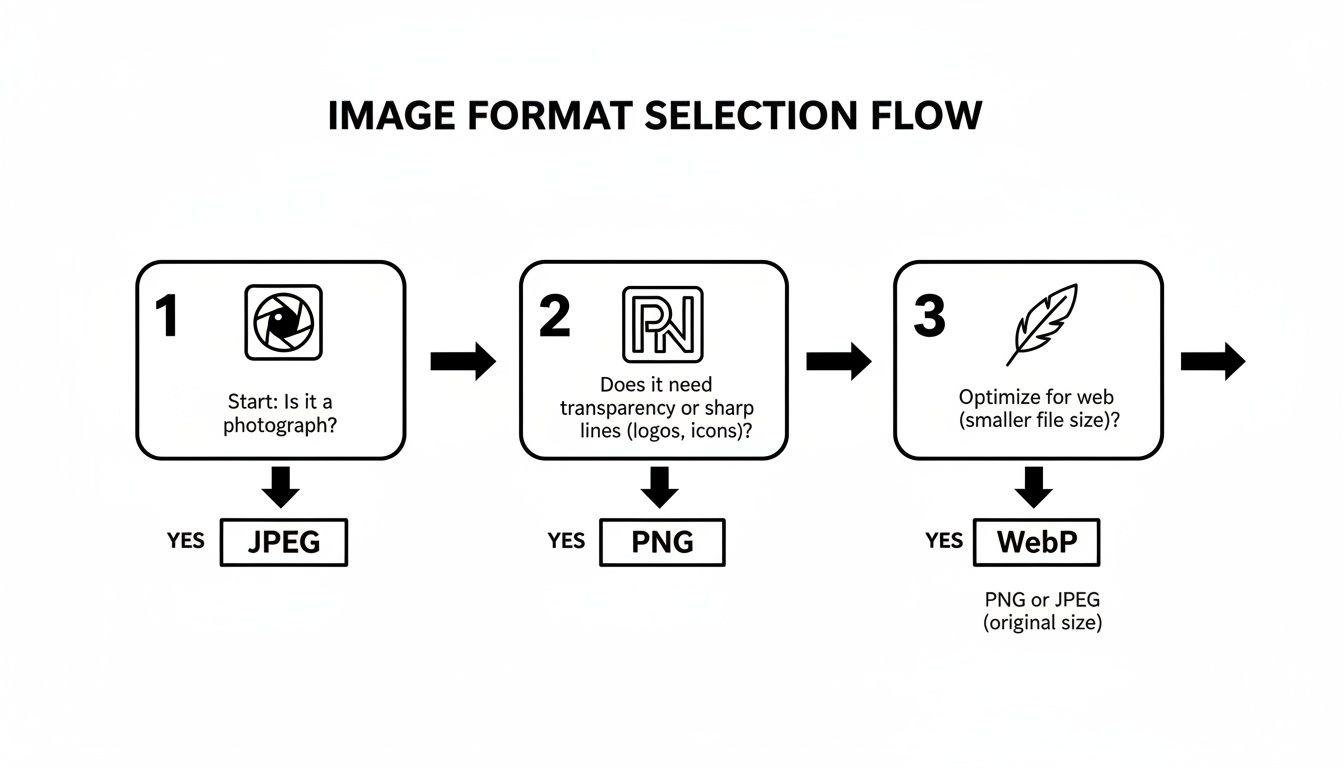
As the chart shows, it's about using the right tool for the job: JPEGs for photos, PNGs for graphics that need transparency, and modern formats like WebP for the best of both worlds. Making sure your visuals stay sharp and load quickly is just as important on social media, too. You can learn more about optimizing images for Instagram with best export settings to keep your content looking its best everywhere.
3. Turn Your Images Into SEO Magnets
Getting your images compressed and resized is half the battle. Now, we need to make sure Google understands what your images are about.
When you get this right, your images stop being just decoration. They become individual assets that can pull in new traffic all on their own. This small detail separates a professional, lead-generating website from an amateur one, and it starts before you hit the "upload" button.
Name Your Files for Humans and Search Engines
First things first: search engines read your file names. If you upload a photo named IMG_4582.jpg, you're telling Google nothing. It’s a huge missed opportunity.
Before uploading, get into the habit of renaming every image with a descriptive, keyword-rich title. Always separate words with hyphens, not underscores.
Here’s what we mean:
- Bad:
photo1.jpg - Good:
murrieta-landscaping-drought-tolerant-plants.jpg - Bad:
NewProject.png - Good:
custom-cabinet-installation-temecula-ca.png
This simple tweak gives Google immediate context. It’s a key step in helping your work show up in Google Image Search when potential customers are looking for exactly what you do.
Write Alt Text That Actually Helps
Alt text (alternative text) is the description you add to an image in your website’s backend. It’s critical for two reasons:
- It describes the image for visually impaired users who rely on screen readers.
- It gives search engines a text-based description if the image can't load.
Good alt text is descriptive and weaves in relevant keywords without sounding robotic. Think of it this way: how would you describe the image to someone over the phone?
Bad Alt Text: "image" or "auto shop"
Good Alt Text: "ASE-certified mechanic performing an oil change on a Ford F-150 at our Menifee auto repair shop."
That level of detail not only makes your site more accessible but also reinforces to Google what your page is about. Our guide on how to improve website rankings goes deeper into how small details like this compound into significant SEO wins.
Websites with well-optimized images get 94% more views than their text-only counterparts. Better yet, great visuals can keep a visitor engaged 88% longer, lowering your bounce rate and signaling to Google that your content is high-quality.
By consistently applying these naming and alt text strategies, you turn your project gallery from a simple portfolio into a powerful magnet for organic traffic. If you want to see how all these techniques fit together, check out this comprehensive guide on how to optimize images for web.
4. Go Pro With Lazy Loading and CDNs

You've resized, compressed, and smartly named your images. Now we're getting into the advanced techniques that take a site from "fast enough" to "impressively quick." These are the two strategies we implement to give our clients a serious performance edge.
First up is lazy loading. It’s a simple concept that tells the browser, "Don't download an image until the user is about to scroll to it."
This dramatically cuts down the initial page load time. Instead of making a visitor download every single image on a long page—including the ones at the very bottom—their browser only grabs what’s immediately visible. Your site feels snappy from the moment it loads.
Why You Can't Skip Lazy Loading
Imagine you’re a contractor with a huge gallery of project photos. Without lazy loading, a new visitor has to sit there while dozens of high-res images download before they can even scroll. Most won’t wait.
With lazy loading, the top of the page appears almost instantly. As they scroll down to see more of your work, the images fade in smoothly, right when they need them. It's a much better user experience.
This is all about perceived performance. It shows you respect your visitor’s time (and their mobile data plan), creating a seamless experience that builds confidence. Modern WordPress and most good plugins handle this automatically now, so there’s really no excuse not to use it.
Loading only what's needed, when it's needed, gives you the fastest possible first impression. It's a small change that can make the difference between a lost visitor and a new lead.
Supercharge Your Site With a Content Delivery Network
The second pro-level tool is a Content Delivery Network (CDN). This might sound technical, but the idea is simple and powerful for any business that wants to grow.
A CDN is a global network of servers that all keep a copy of your website's static files, like your images. When someone visits your site, the CDN intelligently sends the images from the server that is physically closest to them.
Let’s say your main web server is in Los Angeles. If a potential customer from London visits, they won't have to wait for your images to travel across the Atlantic. Instead, the CDN serves them from a local server in the UK.
Less distance means less travel time, which means your images load much faster. It ensures a consistently fast experience for every user, no matter where they are.
Many of the best managed WordPress hosting plans we recommend to clients already bundle a high-performance CDN. They know it's essential for a modern, professional website. Combining a CDN with lazy loading creates a high-speed platform ready to turn visitors into customers.
Common Questions About Image Optimization
Even with a solid plan, a few questions always come up. Nailing these details is what separates a decent website from one that genuinely drives business.
Here are a few of the most common questions we get from business owners.
What Is the Ideal File Size for a Web Image?
There's no single magic number, but these benchmarks will get you 90% of the way there.
For most images on a blog post or service page, aim to keep them under 150 KB. For a big "hero" image that stretches across the top of your homepage, try to keep that under 300 KB.
The real goal is to balance a crisp, professional look with a tiny file size. Your photos should reflect the quality of your brand, but you don't need a massive 5 MB print-quality file for a small icon on your site.
Do I Still Need to Optimize Images on WordPress?
Yes, 100%. While modern WordPress has gotten much better at handling some basic image tasks, it's not a complete, hands-off solution. Think of it as a helpful assistant, not an expert.
You are still responsible for the most critical steps: resizing your images to the right dimensions before you upload them and choosing the best file format (like WebP).
Think of it this way: WordPress gives you the garage, but you still have to bring in the high-performance engine. We always recommend using a dedicated image optimization plugin like ShortPixel or Imagify to handle the heavy lifting.
These tools work in the background, compressing your images and converting them to modern formats without you having to think about it. They give you more control and achieve far better results than the default WordPress settings ever could.
How Does Image Optimization Affect My Google Ranking?
Image optimization boosts your Google ranking in a few key ways.
First, it directly improves your Page Speed. Google has been clear that site speed is a ranking factor, and slow-loading images are one of the biggest culprits holding websites back.
Second, smart file names and descriptive alt text give Google’s crawlers crucial context. They start to understand what your images show, which is how you get your work to show up in Google Image Search. For a contractor, landscaper, or dental office, this can be a goldmine of qualified traffic.
Finally, a faster website is just a better website. Visitors are less likely to leave (a lower bounce rate) and will stick around longer. These are powerful signals that tell Google your site is a quality resource worth showing to more people.
Optimizing your images isn't just a technical chore to check off a list—it's a fundamental part of building a website that works as hard as you do. If you're tired of the guesswork and want a strategic partner to turn your website into a reliable lead-generation machine, we're here to help.
The team at Uncommon Web Design builds conversion-focused websites that are fast, professional, and designed to drive measurable growth for your business.
Book a no-obligation strategy call today to see how we can build a website that wins you more customers.


